1. File>New. (Fill with black color)
2. Select type tool and type something. Duplicate this layer. Hide it. Use font color white and font style Impact.
3. Right click the text and rasterize it. Goto Filter>blur>Gaussian blur. Use amount 2 to 3.
4. Select smudge tool. Use 17 pixel soft brush, strength: 60 to 70.
5. Slowly drag over the text area in upward direction.
6. Goto Layer>New layer adjustment>color balance.
Midtones: +70/0/-70
shadow: +70/0/-70
highlight: +70/0/-20
7. Unhide the duplicated layer and change its font color to black and blending mode to overlay.
Monday, November 29, 2010
How to create EXPLODING PLANET? - photoshop tutorial
1. File>New.
2. Fill with black color. Add one new layer. Select the new layer and goto Filter>Render>3D transform. Settings as:
Choose sphere icon and drag over the transparent part and use track ball to rotate. Then click on option button.
Choose high resolution.
anti-analysing to high. and click OK.
3. Duplicate the layer and hide duplicate layer. Spherize the layer. Goto Layer>Merge visible (CTRL+Shift+E).
4. Goto Filter>Distort>Polar co-ordinate. Polar to: RECTANGLE.
5. Edit>Transform>90 degree c.
6. Filter>Stylize>Wind. Check "From the right" option.
7. Edit>transform>90 degree ccw.
8. Filter>Distort>Polar co-ordinate. Check "Rectangle to Polar".
9. Filter>Distort>Ocean ripple. Ripple size to 15 and Ripple magnitude to 6.
10. Select elliptical marquee to select certain part of sphere. Then press "CTRL+Shift+I" and goto select>Feather.
11. Use Settings as 5 pixel value.
12. Filter>Blur>Radial blur. Settings as:
45 %
zoom
best
13. Goto Filter>Sharpen>Unsharpen Mask. Settings as:
Amount: 500
Radius: 4
Threshold: 35
14. Unhide the duplicated layer and repeat no. 10th step & apply no. 9th step too. Change this layer to difference mode
mode click on layer>adjustment>color balance. Input value: 70.
APPLYING ALPHA CHANNEL :- - photoshop tutorial
1. Open an image. (Open two images separately).
2. Now "CTRL+A" to select one image and "CTRL+C" (copy it) and close it.
3. Click on the second image and goto Window>channel. In channel palette, Add a new layer i.e. Alpha channel.
4. Paste the two image in the new alpha channel. Adjust the pasted image position and click on RGB channel.
5. After this click on layer palette and select the image layer and goto Filter>Render>Lightening effect. Settings as:
Lightning style: 0 clock
Texture channel: Alpha and Click OK
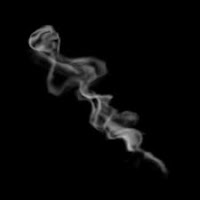
How to create SMOKE EFFECT? - photoshop tutorial
 1. File>New.
2. Select polygonal marquee and draw a shape.
3. Fill with light color (any color).
4. Now select dodge tool and drag over the edge area.
5. Select burn tool and drag over the middle area.
6. Then goto Filter>Distort>Wave. Don't change the settings.
7. Decrease the layers opacity from 30 to 40%.
8. Repeat no. 6th step again.
How to create SWRIL TEXT? - photoshop tutorial
1. File>New. (Fill with black color)
2. Select type tool and type something. (text color=white)
3. "CTRL+CLICK" on text layer and add one new layer above the text layer. And goto Filter>Render>Clouds.
4. Then after press "CTRL+D" to deselect.
5. Again goto Filter>Sharpen>Unsharpen mask. Settings as:
Amount: 80
Radius: 4.2
6. Goto Filter>Stylize>Wind. Use it once from the left and then from the right.
7. Click on the original text layer. "CTRL+CLICK" to select. Rasterize it.
8. Again goto Filter>Stylize>Wind. Once from the right and press "CTRL+F".
9. Goto Filter>Distort>Twril. Use amount: 360
10. Now click on Layer>Adjustment>Color balance.
Input the values for shadow, midtones and highlight.
11. If you want to, apply Hue/Saturation.
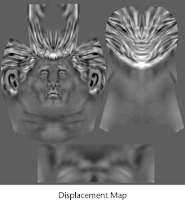
how to create DISPLACEMENT MAP? - photoshop tutorial
 1. File>New. Fill the layer with black color.
 2. Fill some parts with white i.e. Make black and white color combination.
2. Now save this document as "dismap.psd."
3. Now open a new image and goto Filter>Distort>Displace. Settings as:
Horizental scale: 5
Vertical scale: 10 and click ok.
4. Select your saved dismap.psd and click open.
how to create COLOR HALFTONE? - photoshop tutorial
1. Open a new image. Select a blurry brush (17 pixel brush)
2. Click on quick mask mode button and select the image parts using brush.
3. Goto Filter>Pixellate>Color halftone.
4. Then press "Delete" to remove the background of an image.
2. Click on quick mask mode button and select the image parts using brush.
3. Goto Filter>Pixellate>Color halftone.
4. Then press "Delete" to remove the background of an image.
How to create SKETCH EFFECT? - photoshop tutorial
1. Open a new image file in photoshop.
2. Goto Filter>Find edges.
3. Press "CTRL+SHIFT+F" and decrease the opacity level in fade box.
4. Then press "CTRL+SHIFT+U" to desaturate.
2. Goto Filter>Find edges.
3. Press "CTRL+SHIFT+F" and decrease the opacity level in fade box.
4. Then press "CTRL+SHIFT+U" to desaturate.
To create GEL TEXT? - photoshop tutorial
 1. Open a new document and type something. Rasterize the text.
2. Goto Select>Modify>Contract. Give some value and click ok.
3. Select a light foreground color and fill it. Goto Filter>Blur>Gaussian blur. Input 2 as amount values. And deselect it.
4. Right click the text layer>Blending option>Bevel and Emboss. Settings as:
Use Inner Bevel, value as:
Technique: Smooth
Depth: 61
Size: 8
Shading angle: 30 degree
Remove the checkmark from use global light.
5. Use drop shadow and click ok.
Subscribe to:
Comments (Atom)


